chapter 2 Introductory Project
Preview
• space bar » preview (not in real time, no audio)
• click on the last button on the preview panel
• 0 (zero on the key pad) » Ram RealTime preview with audio
Output in Render Queue
1. adjust settings
2. set "output to" location
3. click on "Render"
chapter 3 Getting Started
Add content to a composition
• command + / to add content to the center of the composition panel
chapter 4 Learning to Animate
T R A P S
T: Opacity
R: Rotation [negative values mean counter clockwise]
A: Anchor Point
P: Position
S: Scale [negative values mean flipping the content]
press any key of the five = show the one in layers panel
Shift + press any key of the five = adding one to the existing list
Reset anchor point
press y key+drag or choose "Pan Behind Tool"
Puppet Tool

Open/fold layer's key frames
• select the layer
• press or double-press "U" key
Command key for puppet tool
record my mouse movement while dragging the puppet tool
Copy/past key frame
• select one or more key frames (can use marquee)
• copy and then place the play-head on the timeline
• paste keyframes where the play-head is
Shortcuts
Home - go to the beginning of timeline
End - go to the end of timeline
Page down - next frame
Page up - previous frame
J - the previous key frame
K - the next key frame
chapter 5 Precomposing and Nesting Compositions
Navigation
• Double click the pre-composition to go inside
• click the Shift key, then use the arrow keys or mouse to go forward and backward
Duplicate : command key + D
chapter 6 Effects
Reset values
• the yellow "Reset"
• right-click on any settings, such as Scale, Opacity
Apply Effects
• drag to the layer
• choose the layer first, double click the effect
Toggle fx icon to show/hide the effect
Create a fire ball
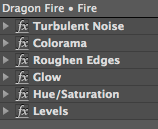
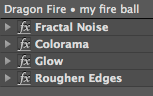
Cycore effects is powerful and fast
Blur Effects are cool when use with particles
(Two blur effects here)
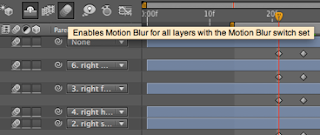
Motion Blur
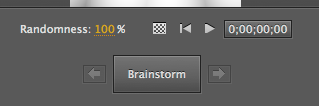
Brainstorm
"Randomness" controls variations
chapter 7 Video
Shorten layers
• drag the timeline ends of the footage
• shift drag to snap to the playhead
• Edit » Split Layer (at the playhead)
• Option + Home key to bring the footage timeline back to beginning
Rename layers
press return key and don't double-click
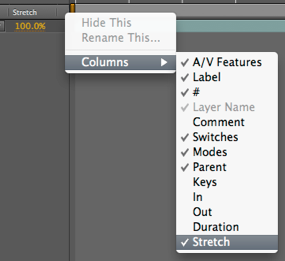
Change video speed
option 1: Stretch on the time line (ok quality, fast rendering)
 option 2: Timewarp effect (great quality, long rendering)
option 3: in-camera slow-motion or fast-motion shooting (best quality)
Import footage with an alpha channel
• choose the alpha channel options in the import window
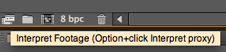
Change footage's alpha channel setting
1. select the footage
2. choose Interpret Footage
Hide layers

chapter 8 Color-correcting footage
Cinematic color treatments
• artistic eye
• combine color balance, hue/saturation, level, and more
A quick vignette
1. create a solid black layer
2. choose the ellipse Shape tool from the tool bar to create a mask
3. double-click on the ellipse tool to create an ellipse at the same size of the project
4. change the mask setting from Add to Subtract
5. adjust feather value
Colorizing black-and-white footage - 5 ways
• Hue/Saturation » select Colorize
• Color Balance
• Black & White
• Tint
• Tritone
• Colorama (it has preset)
Adjustment layers
• effect all layers underneath it
• carry Color Correction effects
• also carry Noise and Distort effects, and maybe more
chapter 9 Text
apply text animation presets
• select the layer and place the playhead where I want it to be
• go to the fly-out menu of the Effects and Presets panel » Browse Presets
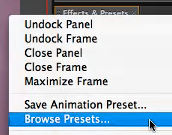 • find Text presets and browse
• double-click the ideal preset to apply to the selected layer
Animate text manually
• apply animation to text
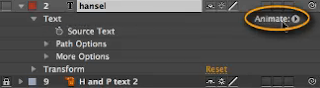 • add more settings to the existing animation
 http://www.lynda.com/home/Player.aspx?lpk4=64230
Layer Style
• add a layer style: either right-click on the layer or go to the Layer menu • Gradient Overlay looks good
chapter 10 Becoming More Efficient
work areas
• purpose: only render part of the composition
• drag the bars on timeline to set the work area
• press b and n key to set the work area according to the playhead
• shift + home, shift + end for navigating to the beginning and end of the work area
• shift + ~ : collapse/open selected layers
add layer markers
press control + 8 or Layer menu » Add Marker
add comp markers
drag from the timeline's marker icon
replace a footage
1. select the layer with the old footage
2. hold Option key
3. drag the new footage from the project panel over the selected layer in the composition panel
4. then release
navigate the timeline
• Option key + scrolling the mouse wheel: zoom
• Shift key + scrolling the mouse wheel: forward and backward
• d key: center the current playhead
navigate among layers
• command + up/down arrow
cropping and arranging layers
• option + [ or ]: crop layer
• [ or ]: move layer around the playhead
• option + home or end: move layer to either end of the timeline
• i or o: move playhead to either end of the cropped layer
• page-up or page-down: move playhead one frame next or previous (not involving layers)
chapter 11 Painting
paint brush
• works only in the layer comp panel
• turn on "paint on transparent"
• hold command key and drag to increase/decrease the brush size
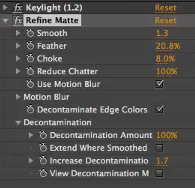
Roto brush
• works at 100% view/full resolution
• works only in the layer comp panel
• Freeze after selecting the object
• in the Roto Brush Effect: try Refine Matte, Smooth, Reduce Chatter
http://www.lynda.com/home/Player.aspx?lpk4=64244
Write-on Effect for growing vines • works in the layer comp panel
• key frame bursh position and size
http://www.lynda.com/home/Player.aspx?lpk4=64245
chapter 12 masks and shape layers
make a mask
1. select the layer in the composition panel or timeline panel
2. choose the shape tool and draw over the layer
about masks
• change "add" to "subtract" to invert the mask or just check "Inverted"
• mask's path feather, opacity, expansion :: animate the settings
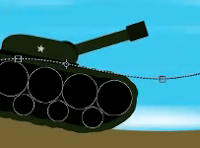
bubbles effect: foam effect
press and double-press m key
auto-trace
• Layer » Auto-trace
• choose "current frame" for still image result; "work area" for moving footage
• the preview looks much worse than the actual result
• some effects work with auto-traced layers/shapes: such as Stroke » such effects can be applied to multiple masks
http://www.lynda.com/home/Player.aspx?lpk4=64249
mask objects/footage with other objects/footage - awesome results!!!!!!
 http://www.lynda.com/home/Player.aspx?lpk4=64250
create a shape layer
1. don't select any layers
2. draw a shape
• "Fill" and the fill color icon have different dialog windows
• use "Add" menu for a polystar - awesome results!!!!!!
http://www.lynda.com/home/Player.aspx?lpk4=64252

chapter 13 3D
3D layer is always above 2D layers
 • negative values are closer to the viewer (the opposite of Processing)
Add camera
1. right-click on the LEFT of the layer's name (must)
2. choose New » Camera
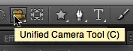
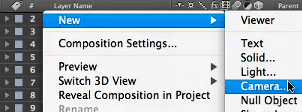 • Unified Camera
Add lighting
1. right-click on the LEFT of the layer name (must)
2. choose New » light
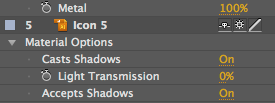
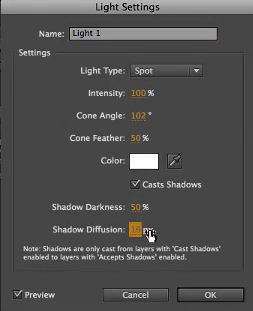
Add shadows
1. turn on Casts Shadows in this window and adjust the values
2. open each layer pressing "Command a" "Shift ~" and double-press "a"
3. turn on "Casts Shadows" for each layer (if all layers are selected, doing one layer effects all layers)
• Shadow Diffusion is for a softer edge

 Add Depth of Field
1. open the camera layer
2. turn on Depth of Field and adjust Distance, Aperture, and Blur Level

Shatter Effect: blowing a wall (nice!)
http://www.lynda.com/home/Player.aspx?lpk4=64258
chapter 14 Keying and Compositing
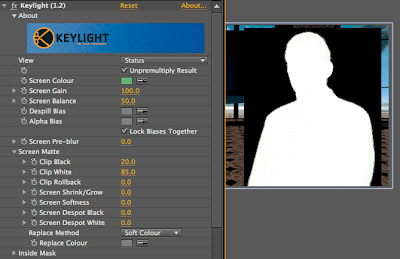
Keying
• the best keying effect — Keylight
• change Screen Color according to the back drop
• "view: Status" to see the gray area
• under "Screen Matte": "Clip black" and "Clip white" values to set the gray area
Refine Matte effect for correcting bad green screen result
http://www.lynda.com/home/Player.aspx?lpk4=64261
Film visual effect (I like it) (check the layers of the file)
http://www.lynda.com/home/Player.aspx?lpk4=64263

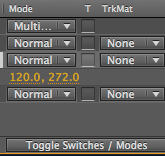
Blend Mode
chapter 15 Intermediate Animation
Orientation to motion path
• use menu or right-click on the layer

Motion Sketch
• record mouse location + speed!
• increase Smooth value to make the movement smooth
• check "background" to show the bg

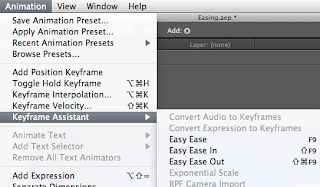
 Easing
1. select the key frame2. use the menu
Graph Editor
http://www.lynda.com/home/Player.aspx?lpk4=64272
Auto-keyframes (from a different video course)
• the big red button
http://www.lynda.com/home/Player.aspx?lpk4=63399
chapter 16 Stabilizing and Tracking Motion
Work inside the layer panel
• it works inside the composition panel as well
Stabilizing
http://www.lynda.com/home/Player.aspx?lpk4=64274
Tracking• including lights
http://www.lynda.com/home/Player.aspx?lpk4=64275
chapter 17 Parenting and Expressions
Parenting - grouping one layer to another, then another...
• work with Position, Anchor Point, Rotation, Scale
• doesn't work with Opacity and Effects

Parenting with Null objects - grouping multiple layers to a Null layer
1. create a new Null layer
2. select multiple layers, then repeat the above step to make the Null layer a parenting layer
• looks great when using in 3D!
http://www.lynda.com/home/Player.aspx?lpk4=64279
Create Expressions
• Any key frames can have Experssions
• Option key + click on the Stop Watch
 • manual input
• auto input from parenting data, even a puppet pin (note: not have to be parenting layers)
http://www.lynda.com/home/Player.aspx?lpk4=64280

Wiggle expression - awesome effect!
• wiggle position, color effects, and so on
• wiggle(5,10) means wiggle(times per second, pixel threshold)
• great for the background image shaking and shaking objects
http://www.lynda.com/home/Player.aspx?lpk4=64282
isolating layer view
chapter 18 Audio
• press "0" or "."key on the Number keypad(!) to listen to the audio
• audio layers are treated same as video layers
Audio Effects
• Reverb is pretty interesting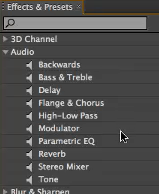
chapter 19 Rendering and Compression
Rendering
• Render Queue
• don't forget check "Audio Output"
http://www.lynda.com/home/Player.aspx?lpk4=64289
Compression
• QuickTime - Animation - 100% :: great quality
• H.264 highest settings :: good for web, so so quality
http://www.lynda.com/home/Player.aspx?lpk4=64290
chapter 20 Integration
Copy paths from Illustrator and Photoshop
• just Paste
• click on the "Position" of a layer, then paste - this makes the path a motion path for that layer's content
Flash
save files in FLV/F4V
export files in both SWF and XFL (like FLA)
chapter 3 Getting Started
Maximize a panel
1. mouse over a panel
2. press ~ key
Create a new composition based on an existing footage
drag the footage to the "new composition" icon
Add content to a composition
• command + / to add content to the center of the composition panel
• drag a content to the composition, timeline, or layer panel
Composition Setting commend + K, or go to the menu Composition, or fly out menu of the timeline panel
Duration input inside the Composition Setting
15 = 00;00;15
115 = 00;01;15
5.. = 05;00;00
Frame Rate
Web 15 - 20
NTSC 29.97
PAL 25
Film 24
HD PAL 50
HD NTSC 60
Video Dimensions
Full HDV 1440 x 1080
HDV/HDTV 1280 x 720
DV 720 x 480
chapter 4 Learning to Animate
Illustrator file
import as a composition to keep all layers
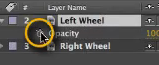
Solo view
choose "•" on layers panel
T R A P S
T: Opacity
R: Rotation [negative values mean counter clockwise]
A: Anchor Point
P: Position
S: Scale [negative values mean flipping the content]
press any key of the five = show the one in layers panel
Shift + press any key of the five = adding one to the existing list
Reset anchor point
press y key+drag or choose "Pan Behind Tool"


• select the layer
• press or double-press "U" key
Command key for puppet tool
record my mouse movement while dragging the puppet tool
Copy/past key frame
• select one or more key frames (can use marquee)
• copy and then place the play-head on the timeline
• paste keyframes where the play-head is
Shortcuts
Home - go to the beginning of timeline
End - go to the end of timeline
Page down - next frame
Page up - previous frame
J - the previous key frame
K - the next key frame
chapter 5 Precomposing and Nesting Compositions
Group/Pre-comp (for both layers and compositions)
Layer » Pre-compose
Navigation
• Double click the pre-composition to go inside
• click the Shift key, then use the arrow keys or mouse to go forward and backward
Duplicate : command key + D
chapter 6 Effects
Create a new layer
1. in a composition
2. Layer » New or right-click in the timeline panel
1. in a composition
2. Layer » New or right-click in the timeline panel
Reset values
• the yellow "Reset"
• right-click on any settings, such as Scale, Opacity
Apply Effects
• drag to the layer
• choose the layer first, double click the effect
Toggle fx icon to show/hide the effect
Create a fire ball


Cycore effects is powerful and fast
Blur Effects are cool when use with particles
(Two blur effects here)

Motion Blur

Brainstorm
"Randomness" controls variations

chapter 7 Video
Shorten layers
• drag the timeline ends of the footage
• shift drag to snap to the playhead
• Edit » Split Layer (at the playhead)
• Option + Home key to bring the footage timeline back to beginning
Trim video
• double-click a footage in a project panel or timeline to edit it in the footage panel or layer panel
• Ripple Insert Edit or Overlay Insert Edit
• more: http://www.lynda.com/home/Player.aspx?lpk4=64215
• double-click a footage in a project panel or timeline to edit it in the footage panel or layer panel
• Ripple Insert Edit or Overlay Insert Edit
• more: http://www.lynda.com/home/Player.aspx?lpk4=64215
Rename layers
press return key and don't double-click
Change video speed
option 1: Stretch on the time line (ok quality, fast rendering)
 option 2: Timewarp effect (great quality, long rendering)
option 3: in-camera slow-motion or fast-motion shooting (best quality)
Import footage with an alpha channel
• choose the alpha channel options in the import window
Change footage's alpha channel setting
1. select the footage
2. choose Interpret Footage

Hide layers

chapter 8 Color-correcting footage
Cinematic color treatments
• artistic eye
• combine color balance, hue/saturation, level, and more
A quick vignette
1. create a solid black layer
2. choose the ellipse Shape tool from the tool bar to create a mask
3. double-click on the ellipse tool to create an ellipse at the same size of the project
4. change the mask setting from Add to Subtract
5. adjust feather value
Colorizing black-and-white footage - 5 ways
• Hue/Saturation » select Colorize
• Color Balance
• Black & White
• Tint
• Tritone
• Colorama (it has preset)
Adjustment layers
• effect all layers underneath it
• carry Color Correction effects
• also carry Noise and Distort effects, and maybe more
chapter 9 Text
apply text animation presets
• select the layer and place the playhead where I want it to be
• go to the fly-out menu of the Effects and Presets panel » Browse Presets
 • find Text presets and browse
• double-click the ideal preset to apply to the selected layer
Animate text manually
• apply animation to text
 • add more settings to the existing animation
 http://www.lynda.com/home/Player.aspx?lpk4=64230
Layer Style
• add a layer style: either right-click on the layer or go to the Layer menu
 • Gradient Overlay looks good
chapter 10 Becoming More Efficient
work areas
• purpose: only render part of the composition
• drag the bars on timeline to set the work area
• press b and n key to set the work area according to the playhead
• shift + home, shift + end for navigating to the beginning and end of the work area
• shift + ~ : collapse/open selected layers
add layer markers
press control + 8 or Layer menu » Add Marker
add comp markers
drag from the timeline's marker icon
replace a footage
1. select the layer with the old footage
2. hold Option key
3. drag the new footage from the project panel over the selected layer in the composition panel
4. then release
navigate the timeline
• Option key + scrolling the mouse wheel: zoom
• Shift key + scrolling the mouse wheel: forward and backward
• d key: center the current playhead
navigate among layers
• command + up/down arrow
cropping and arranging layers
• option + [ or ]: crop layer
• [ or ]: move layer around the playhead
• option + home or end: move layer to either end of the timeline
• i or o: move playhead to either end of the cropped layer
• page-up or page-down: move playhead one frame next or previous (not involving layers)
chapter 11 Painting
paint brush
• works only in the layer comp panel
• turn on "paint on transparent"
• hold command key and drag to increase/decrease the brush size
Roto brush
• works at 100% view/full resolution
• works only in the layer comp panel
• Freeze after selecting the object
• in the Roto Brush Effect: try Refine Matte, Smooth, Reduce Chatter
http://www.lynda.com/home/Player.aspx?lpk4=64244
Write-on Effect for growing vines • works in the layer comp panel
• key frame bursh position and size
http://www.lynda.com/home/Player.aspx?lpk4=64245
chapter 12 masks and shape layers
make a mask
1. select the layer in the composition panel or timeline panel
2. choose the shape tool and draw over the layer
about masks
• change "add" to "subtract" to invert the mask or just check "Inverted"
• mask's path feather, opacity, expansion :: animate the settings
bubbles effect: foam effect
press and double-press m key
auto-trace
• Layer » Auto-trace
• choose "current frame" for still image result; "work area" for moving footage
• the preview looks much worse than the actual result
• some effects work with auto-traced layers/shapes: such as Stroke » such effects can be applied to multiple masks
http://www.lynda.com/home/Player.aspx?lpk4=64249
mask objects/footage with other objects/footage - awesome results!!!!!!
 http://www.lynda.com/home/Player.aspx?lpk4=64250
create a shape layer
1. don't select any layers
2. draw a shape
• "Fill" and the fill color icon have different dialog windows
• use "Add" menu for a polystar - awesome results!!!!!!
http://www.lynda.com/home/Player.aspx?lpk4=64252

chapter 13 3D
3D layer is always above 2D layers
 • negative values are closer to the viewer (the opposite of Processing)
Add camera
1. right-click on the LEFT of the layer's name (must)
2. choose New » Camera
 • Unified Camera

Add lighting
1. right-click on the LEFT of the layer name (must)
2. choose New » light
Add shadows
1. turn on Casts Shadows in this window and adjust the values
2. open each layer pressing "Command a" "Shift ~" and double-press "a"
3. turn on "Casts Shadows" for each layer (if all layers are selected, doing one layer effects all layers)
• Shadow Diffusion is for a softer edge
 Add Depth of Field
1. open the camera layer
2. turn on Depth of Field and adjust Distance, Aperture, and Blur Level

Shatter Effect: blowing a wall (nice!)
http://www.lynda.com/home/Player.aspx?lpk4=64258
chapter 14 Keying and Compositing
Keying
• the best keying effect — Keylight
• change Screen Color according to the back drop
• "view: Status" to see the gray area
• under "Screen Matte": "Clip black" and "Clip white" values to set the gray area

Refine Matte effect for correcting bad green screen result
http://www.lynda.com/home/Player.aspx?lpk4=64261

Film visual effect (I like it) (check the layers of the file)
http://www.lynda.com/home/Player.aspx?lpk4=64263

Blend Mode

chapter 15 Intermediate Animation
Orientation to motion path
• use menu or right-click on the layer

Motion Sketch
• record mouse location + speed!
• increase Smooth value to make the movement smooth
• check "background" to show the bg

 Easing
1. select the key frame2. use the menu

Graph Editor
http://www.lynda.com/home/Player.aspx?lpk4=64272
Auto-keyframes (from a different video course)
• the big red button
http://www.lynda.com/home/Player.aspx?lpk4=63399
chapter 16 Stabilizing and Tracking Motion
Work inside the layer panel
• it works inside the composition panel as well
Stabilizing
http://www.lynda.com/home/Player.aspx?lpk4=64274
Tracking• including lights
http://www.lynda.com/home/Player.aspx?lpk4=64275
chapter 17 Parenting and Expressions
Parenting - grouping one layer to another, then another...
• work with Position, Anchor Point, Rotation, Scale
• doesn't work with Opacity and Effects

Parenting with Null objects - grouping multiple layers to a Null layer
1. create a new Null layer
2. select multiple layers, then repeat the above step to make the Null layer a parenting layer
• looks great when using in 3D!
http://www.lynda.com/home/Player.aspx?lpk4=64279
Create Expressions
• Any key frames can have Experssions
• Option key + click on the Stop Watch
 • manual input
• auto input from parenting data, even a puppet pin (note: not have to be parenting layers)
http://www.lynda.com/home/Player.aspx?lpk4=64280

Wiggle expression - awesome effect!
• wiggle position, color effects, and so on
• wiggle(5,10) means wiggle(times per second, pixel threshold)
• great for the background image shaking and shaking objects
http://www.lynda.com/home/Player.aspx?lpk4=64282


isolating layer view
chapter 18 Audio
• press "0" or "."key on the Number keypad(!) to listen to the audio
• audio layers are treated same as video layers
Audio Effects
• Reverb is pretty interesting

chapter 19 Rendering and Compression
Rendering
• Render Queue
• don't forget check "Audio Output"
http://www.lynda.com/home/Player.aspx?lpk4=64289
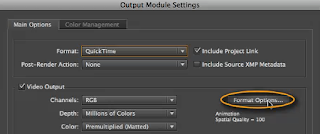
Compression
• QuickTime - Animation - 100% :: great quality
• H.264 highest settings :: good for web, so so quality
http://www.lynda.com/home/Player.aspx?lpk4=64290

chapter 20 Integration
Copy paths from Illustrator and Photoshop
• just Paste
• click on the "Position" of a layer, then paste - this makes the path a motion path for that layer's content
Flash
save files in FLV/F4V
export files in both SWF and XFL (like FLA)