Saturday, May 8, 2010

"Kalpa" Press Release: U-Ram Choe @ bitforms

U-Ram Choe

Kalpa

bitforms gallery


bitforms gallery is pleased to present new sculpture by Korean artist U-Ram Choe in a second solo exhibition. Realized over the course of a year, this work is rooted in a journey to the American Southwest, where the artist encountered complete darkness for the first time. In this environment Choe observed the Milky Way, unpolluted by the atmospheric haze of artificial light. “I encountered the universe,” says Choe. “Passing moments of absolute being exploded into an immense history of life’s origin.”


“The speed of light fascinates me. Everything that we see in the sky has already happened,” says the artist. Evoking the awe and wonder of nighttime skies, several flickering orbs illuminate the gallery space and surround the viewer with sparkling nebulae.

Bringing the experience of stargazing indoors, the installation conjures galactic scale. At the exhibit's center is three-tier swirling mass of treelike brass tendrils, resin and light. Forming a representation of the Milky Way, the motorized construction orbits an axis driven by electrical pulses. Programmed by the artist to run in tandem, a collective installation of nearly a dozen sculptures transforms the gallery into a planetarium of Choe's own personal imagination or universe, filled with stars.


Using celestial motion as a metaphor for spiritual discovery, Choe expresses in this work an ageless curiosity of creation and the origins of life. Informed also by imagery gathered by the Hubble telescope, the individual pieces reflect an intense meditation on the cosmos as a record of spatial and temporal infinity. “The eye of science is looking at God, the beginning,” says Choe. “The rhythmic cycles of movement in the show attempt to capture vast physical record, and our present understanding of it.”


Kalpa:

noun, Sanskrit aeon;

cosmic period of inconceivable duration; the time it takes for a universe to form, stabilize and come to an end, it also includes the period of silence after a universe ends in Buddhism, several analogies are given attempt its understanding:

Imagine a huge empty cube at the beginning of a kalpa, approximately sixteen miles on each side. Once every 100 years, a tiny mustard seed is inserted into the cube. This huge cube will be filled before the kalpa ends.

Imagine a giant rocky mountain at the beginning of the kalpa, approximately 16x16x16 miles (dwarfing Mt. Everest). Every 100 years, a small piece of silk is used to wipe the mountain. The mountain will be completely depleted before the kalpa ends.


Saturday, February 20, 2010

The Latest in Website Interactivity - Noble Desktop

What are JavaScript Frameworks Like Spry & jQuery?
  • JavaScript frameworks are pre-written JavaScript code that do common tasks/effects. They make development easier and faster
  • Adobe's JavaScript framework is called Spry
  • jQuery is probably the most popular JavaScript framework. Lots of people have developed great plugins based on jQuery, which you can download and use.
  • jQuery's advantage is that it can do much more than Spry. It is also more of an industry standard.
JavaScript Frameworks (Spry & jQuery) works on an iPhone, Flash doesn't!

jQuery jquery.com
(min.js is a simplified file of the original js file)

jQuery work samples mediatemple.net/jquery14

Ajax = asynchronous JavaScript and XML » web content can be preloaded behind the scene (ex. jQuery multiple tabs with bookmark support, which means that you can use the Back button to navigate visited tabs)


jQuery Cycle Plugin www.malsup.com/jquery/cycle
This plugin can also cycle DIVs
If recycle images' sizes are different, this plugin will still work.

Samples
  • panic.com/coda » rollover to "Download" to see the pop-up note (the concept of One Window Web Development)
  • www.krop.com/iamgarth » clicking on any icon will scroll down the page and open a larger version » clicking on the enlarged image will navigate you to the next image.
  • dragoninteractive.com » see the animated rollover button
  • resenmedia.com » click on Product » scroll down to Tangibles » click on the image to navigate
CSS can create a whole navbar with all its states (rollover, down, etc.) in one image. This is called CSS Sprites and makes it download faster. (see apple.com top navbar)

The best way to create a good drop-down menu is using CSS.


Fun Stuff: iconfactory iconfactory.com

Since the release of Safari 3.1, there now have an option in Safari's Preferences » Advanced to show/hide the Develop menu

Friday, February 12, 2010

Passage Meditation: Bringing the Deep Wisdom of the Heart into Daily Life - Eknath Easwaran

ISBN-10: 1586380265
ISBN-13: 978-1586380267


The Perennial Philosophy
by Aldous Huxley ~p11 {interested}
Prayer of Saint Francis of Assisi ~p37 {author's high recommendation}
The Gospel of Sri Ramakrishna ~p198 {author's high recommendation}

In India, meditation is called "the end of sorrow" and "mastery of the art of living." ~p13

The Buddha explains, "All that we are is the result of what we have thought." ~p21

Eight Steps of Passage Meditation ~p24
1. Meditation on a Passage
2. Repetition of a Mantram
3. Slowing Down
4. One-pointed Attention
5. Training the Senses
6. Putting Others First
7. Spiritual Companionship
8. Spiritual Reading

Good Passage Sources
Prayer of Saint Francis of Assisi
Twenty-third Psalm
Katha Upanishad

Passages
Let nothing upset you;
Let nothing frighten you;
Everything is changing;
God alone is changeless.
Patience attains the goal.
Who has God lacks nothing;
God alone fills every need.
— Teresa of Avila

A mind that is fast is sick.
A mind that is slow is sound.
A mind that is still is divine.
— Meher Baba

I tell you one thing –
if you want peace of mind,
do not find fault with others.
Rather learn to see your own faults.
Learn to make the whole world your own.
No one is a stranger, my child;
this whole world is your own.
— Sri Sarada Devi

Praise and blame,
gain and loss,
pleasure and sorrow
come and go like the wind.
To be happy,
rest like a giant tree
in the midst of them all.
— Buddha

Before you speak, ask yourself, is it kind, is it necessary, is it true, does it improve on the silence?
— Sai Baba

Four things come not back—the spoken word, the sped arrow, time past, and the neglected opportunity.
— Abbas Ibn al-Ahnaf (c. 750-c. 803) Poet

"Ego" comes from the Latin for "I."
"Ahamkara" means "self-will" in Sanskrit.
"Aham" means "I" in Sanskrit.

The Inner Reaches of Outer Space - Joseph Campbell

The Inner Reaches of Outer Space: Metaphor as Myth and as Religion Joseph Campbell

Joseph Campbell Foundation, 2002


page xx

As stated already centuries ago in the Indian Kena Upanisad (Upanishad): “That which in the lightning flashes forth, makes one blink, and say ‘Ah!’—that ‘Ah!’ refers to divinity.” And centuries before that, in the Chhãndogya Upanisad (c. ninth century B.C.):


When [in the world] one sees nothing else, hears nothing else, recognizes nothing else: that is [participation in] the Infinite. But when one sees, hears, and recognizes only otherness: that is smallness. The Infinite is the immortal. That which is small is mortal.


But sir, that Infinite: upon what is it established?


Upon its own greatness—or rather, not upon greatness. For by greatness people here understand cows and horses, elephants and gold, slaves, wives, mansions and estates. That is not what I mean; not that! For in that context everything is established on something else.


This Infinite of which I speak is below. It is above. It is to the west, to the east, to the south, to the north. It is, in fact, this whole world. And accordingly, with respect to the notion of ego (ahamkãrãdesa): I also am below, above, to the east, to the south, and to the north. I, also, am this whole world.


Or again, with respect to the Self (ãtman): The Self (the Spirit) is below, above, to the west, to the east, to the south, and to the north. The Self (the Spirit), indeed, is the whole world.


Verily, the one who sees this way, thinks and understands this way, takes pleasure in the Self, delights in the Self, dwells with the Self and knows bliss in the Self; such a one is autonomous (svarãj), moving through all the world at pleasure (kãmacãra). Whereas those who think otherwise are ruled by others (anya-rãjan), know but perishable pleasures, and are moved about the world against their will (akãmacãra).


Wednesday, January 20, 2010

Final Cut Pro 6 Essential Effects - Rendering

Course Website
http://www.lynda.com/home/DisplayCourse.aspx?lpk2=428


14. Rendering

Keep in mind: rendering only effects Final Cut during the editing process; the final output will be always high quality.

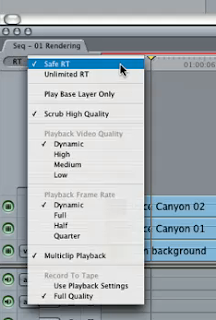
RT menu

tow bars: top one for video; the bottom one for audio

"Safe RT" is for highest quality (bar is in red)
"Unlimited RT" is for decreased quality (bar is in orange) - I like this better
"Play base layer only" is for rendering without effects

Always set the "Playback video quality" to Dynamic

Audio rendering setting: it can be changed according to the speed of the computer HD

For firewire 400 device - set it to 22 MB/s
For firewire 800 device - set it to 44 MB/s

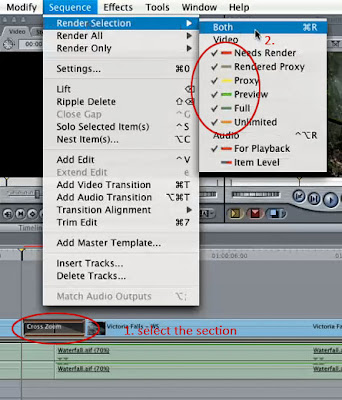
Playing unrendered sequences

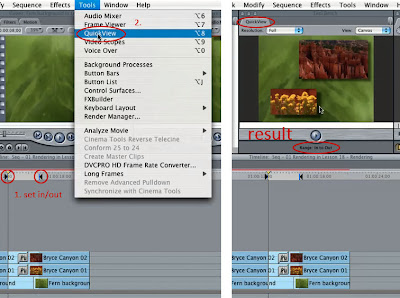
for video - 1. press Option P - 2. QuickView Window
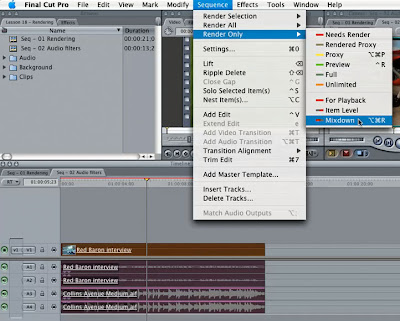
- 3. Sequence menu » Render Selection (Command R) (all color bars should be selected)


for audio

Auto Render is Cool
set to 10 or 15 min

Where to change render settings?

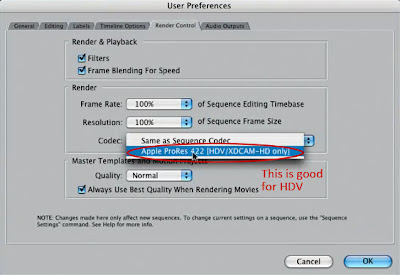
- before the project starts, use "User Preferences"
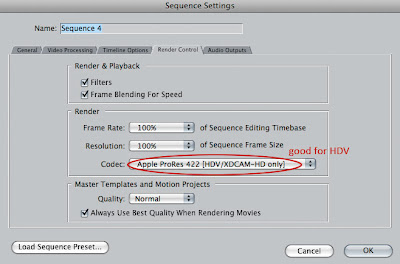
- after the project begins, use "Sequence Settings"

Delete Render Files

Render Manager


Keyboard shortcuts and conclusion


Wednesday, January 13, 2010

Final Cut Pro 6 Essential Editing Part 2

Course Website:
http://www.lynda.com/home/DisplayCourse.aspx?lpk2=430

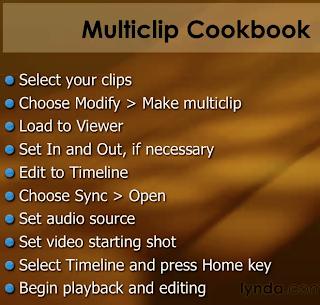
10. Multiclip Editing - watch the movies for details


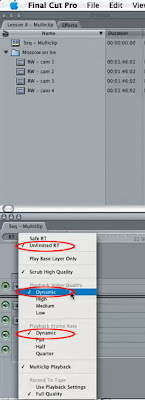
Dynamic RT and Unlimited RT

Safe RT (by default) means that the
video quality is the highest during play-back. However, when working with multiclip, it should be set at Unlimited RT.Unlimited RT decreases the video play-back quality during editing (only); the final video quality is still high.


11. Using transitions

Apply a transition


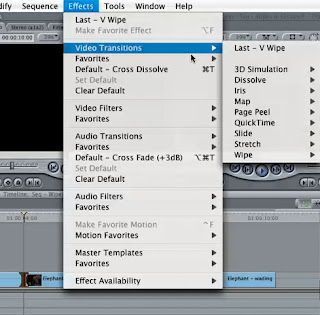
Using the Effect menu


Effects Tab = Effects Menu

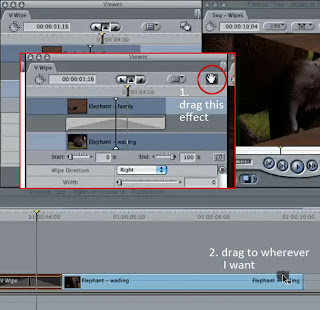
Option drag the effect to duplicate on the timeline

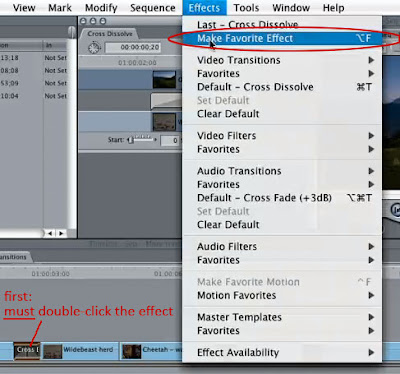
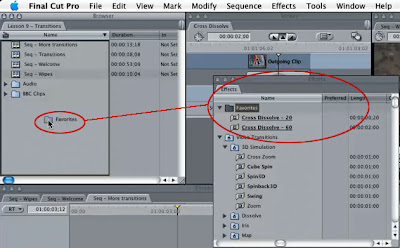
Creating favorite transition


creating favorite


copy Favorites from the Effects folder to the Project folder. This will keep Favorites from being trashed with the application preference file.

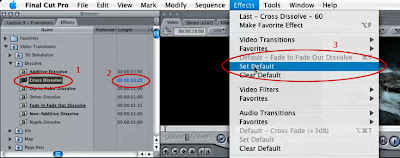
Change the default transition


or press Command + D

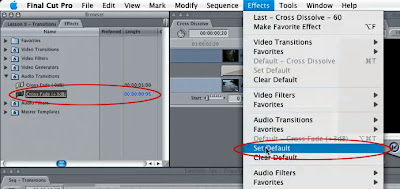
For Audio transitions, according to the instructor, "Cross Fade (+3dB)" should be the default. And 5 frame transition is the his best choice.

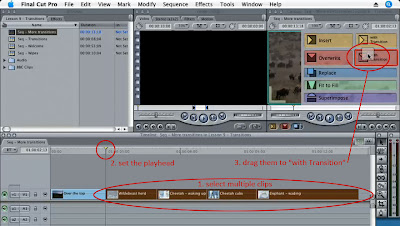
Apply multiple transitions at once


result on the timeline

Intro to rendering


Option + P = preview in the timeline without rendering

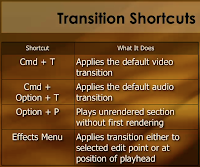
Shortcuts


12. Editing audio


two types: Dual-channel-mono (FCP default) & stereo
Speaking should normally be set at dual-mono

Waveforms
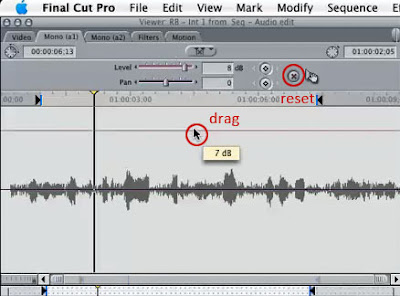
The red line controls volume level; the dark line controls left/right speaker output (called Pan).


or click on the red envelop button (outside of this image)

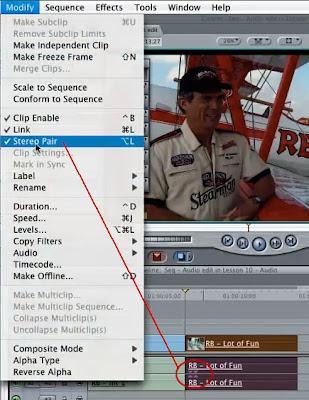
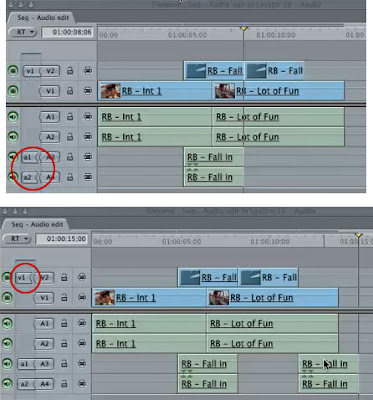
Split or combine audio pairs

Track overlay

FCP allows 99 tracks of video and 99 tracks of audio.

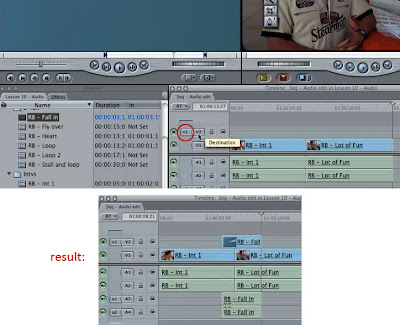
Split inserting video/audio

Trimming audio
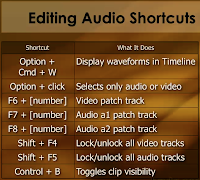
Option + Command + W displays the waive form on the timeline.
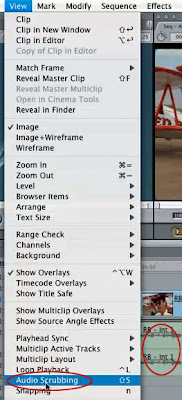
Audio Scrubbing is for hearing audio while scrubbing the timeline.
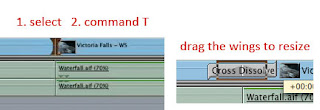
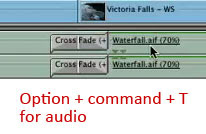
Command + Option + T = adding transition

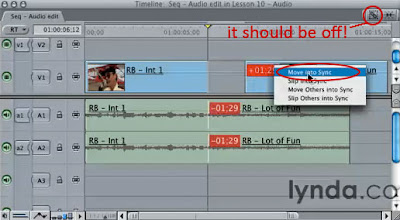
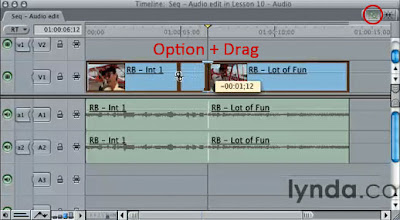
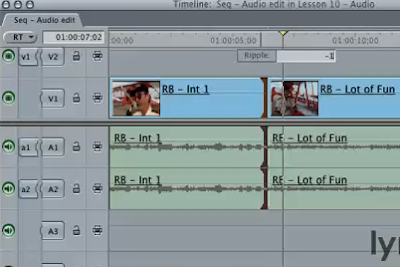
right-click on the red tag and choose "Move into Sync" can fix the broken connection.


1. use the roll tool or ripple tool
2. select/click the joints
3. just type numbers, such as 1 or -1 (go forward or backward 1 frame)

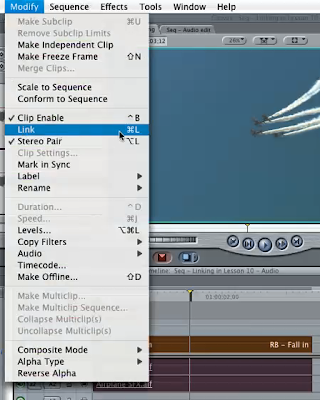
Link and unlink clips

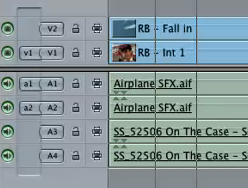
underline means that they are linked
FCP allows up to 24 audio tracks linked to 1 video clip

Visibility Lights
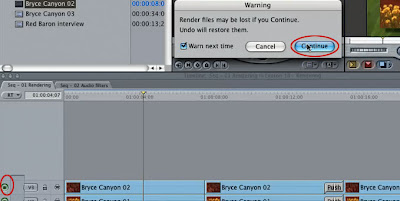
When green visibility lights are off, FCP will delete all selected clips' renderings
and those clips don't export for the final product.

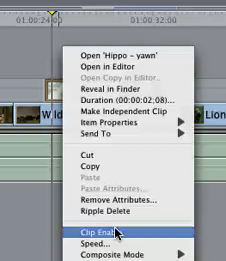
"Clip Enable" (command + B) toggles the clip's visibility.

Shortcuts

13. Mixing audio

Using the Audio Meter and Clip lights
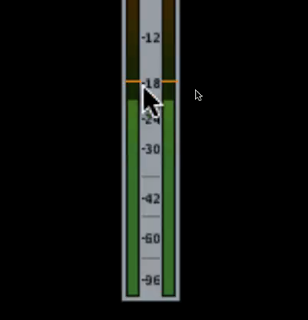
The yellow bar in the Audio Meter means the Pick Hold Indicator showing how loud the sound is in the last two seconds.
The loudest scale on the meter is zero. If the sound goes over zero, the red lights will be turned on.

The red lights on the top should never be on. Otherwise, the final audio output is destroyed.

Setting Clip Audio Levels
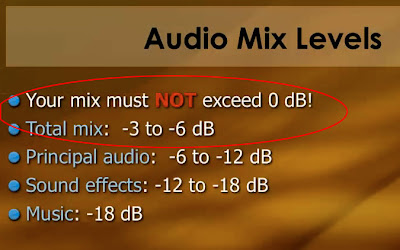
The first two must to be obeyed. the rest three are for suggestions.
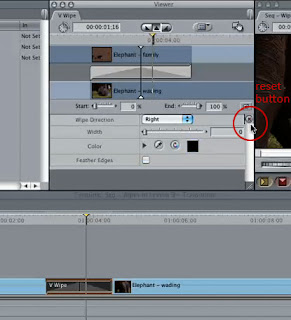
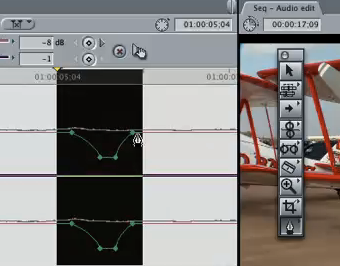
To adjust level/Gain and pan, use the preview window by double clicking on the audio track(s). The reset button is a circle with an "x" on the right side.

value: -6 to -4.5
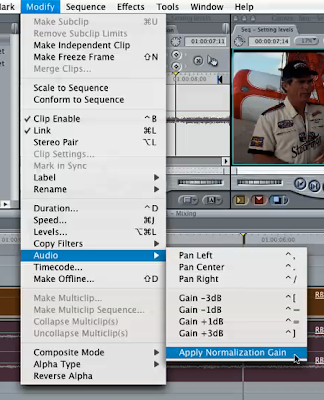
Apply Normalization Gain function normalizes the entire audio gain.
This is good for uneven speech, etc.

Mixing Audio in Final Cut Pro


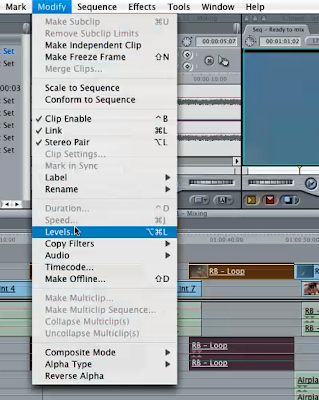
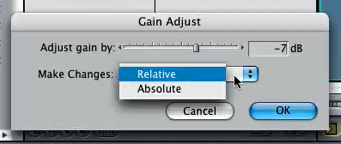
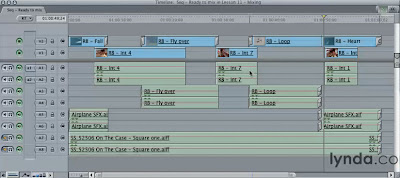
Modify»Level can control multiple audio tracks.

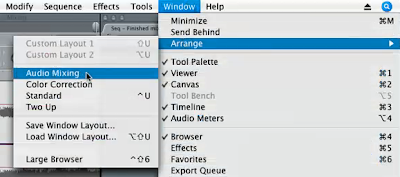
Demo working environment

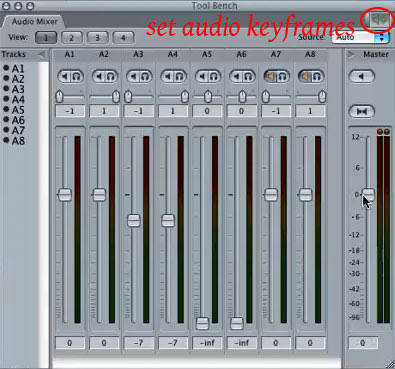
Using the Audio Mixer


always leave the master fader alone!

to reset: Option + click on the slider

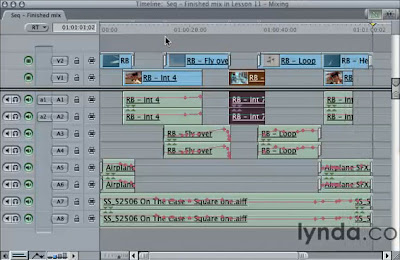
while arrow tool is selected, hold down the Option key, the pen tool will appear when the mouse is close to the pink audio gain line.

Keyframes can be edited by clicking and dragging

If I want to start at a low audio volume and go higher, set the audio level low at first by drag the slider to a low level while the Record Keyframe button is not selected, then select the Record Keyframe button and drag the slider to higher levels.

Demo work result

Finishing your mix

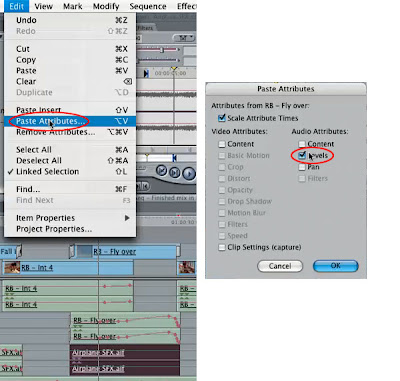
To copy only keyframes from one clip to the next (not the content):
this is also great for editing two mono sound tracks.
1. select and copy the clip
2.
select the next clip
3. Edit»Paste Attributes
4.
choose "Level," then "OK"

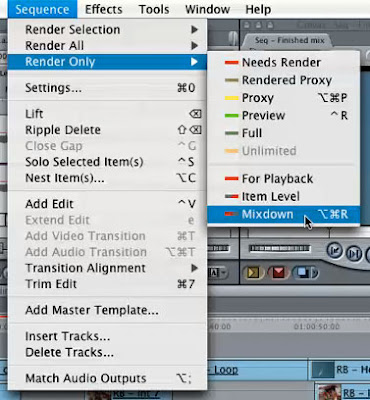
This only renders the audio "Mixdown."

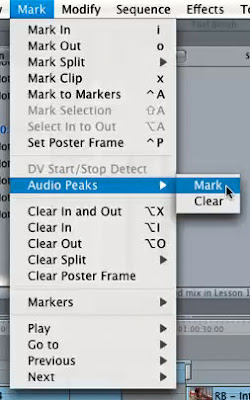
its shows all audio peaks above zero by using labels. Great!
to remove labels, choose "clear"

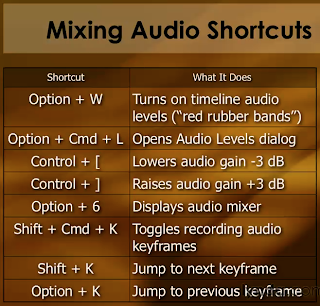
Shortcuts

14. Capturing

need to refresh this chapter

1. always save and name the new project
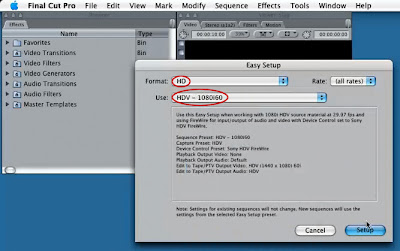
2. ProRes 422 is good for HDV sequences - render-time drops down a lot.

settings for capturing HDV

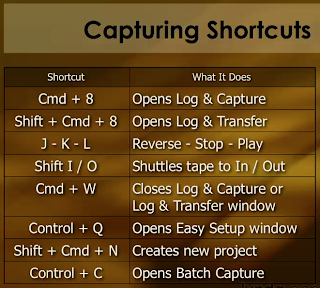
Summary & Shortcuts


16. Importing

Importing files and folders
File » Import » files/folder

Converting compressed audio
FCP supports only uncompressed files: AIFF, WAVE, SD2
Use iTunes to convert MP3/MP4/AAC files to uncompressed files

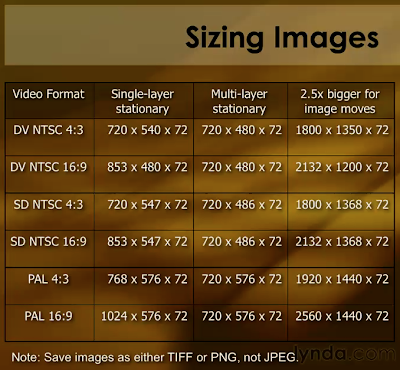
Sizing graphics for video
Computer using square pixels; video using rectangular pixels

Don't use JPEG! - use TIFF or PNG

Shortcuts
Cmd + I = Importing files


17. Exporting

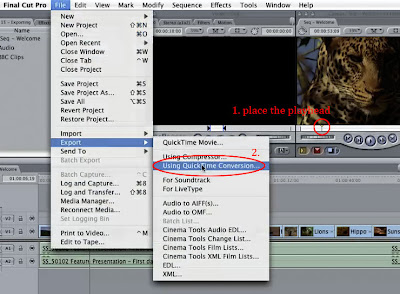
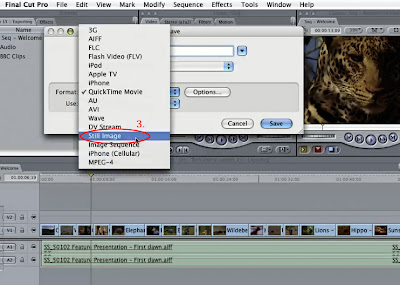
Exporting a still frame
a still frame can be
exported either from the timeline or the viewer. see the 3 steps.


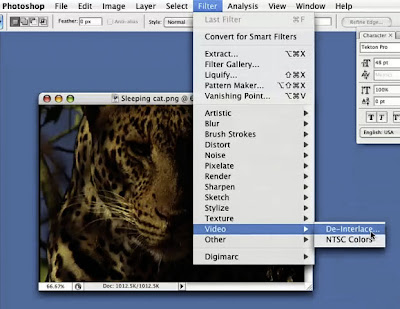
In Photoshop, 1) if the image has thin horizontal lines, do De-Interlace first (use default settings)
In Photoshop, 2) then, change img size from 720x480 to 640x480

Exporting a QuickTime movie

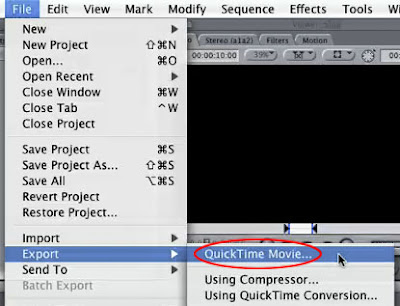
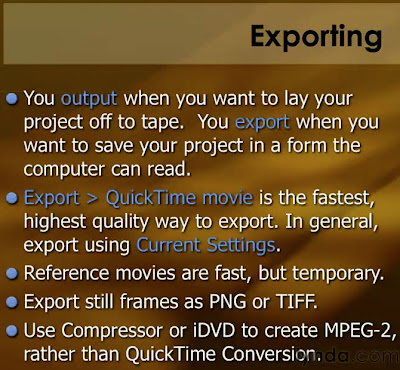
for highest quality and fastest speed, choose "QuickTime Movie"

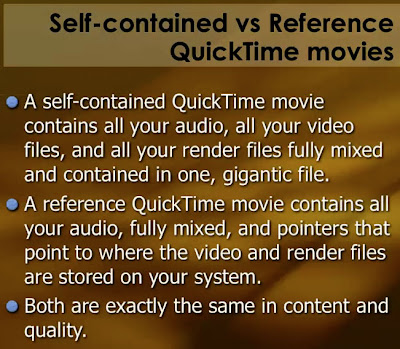
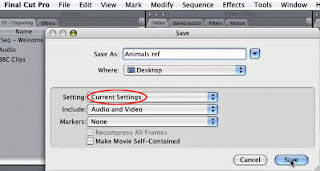
For DVD or web, make a reference movie.

This file type is designed to be a temporary file to move from FCP to compression.

(thoughts: since I cannot find the linked rendered video file, I could however try creating a video(no audio) file first and then create a reference movie. The reference movie contains only audio info. This idea has not been tested yet.)


"Setting: Current Setting" has always the highest quality.

Exporting for Compressor
may get slightly higher quality than "QuickTime Movie," if the video contains a lot of motion.

Exporting for QuickTime conversion
This automatically down samples the videos to 8bit. So it does not provide the highest quality, nor the smallest file size, than "QuickTime Movie." It should only be a temporary solution, not for final output.
(listen to the video lesson again to refresh memory)

Exporting as AIFF and OMF
Exporting audio for Soundtrack Pro
Exporting with multichannel output
(learn the video lessons when I need)

Exporting Summary


18. Managing Media

Making files go offline
right-click on the clip
or go to the Modify menu

Reconnecting files
right-click on the clip
or go to the File menu

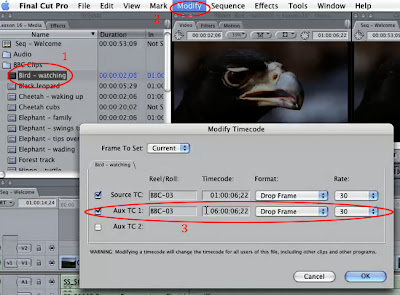
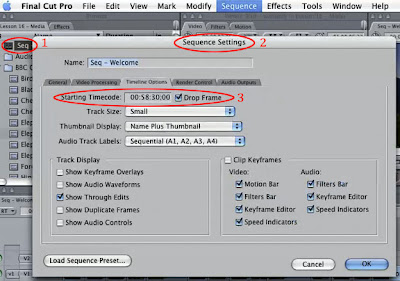
Changing timecode
1. clip timecode change

2. sequence timecode change

to move the clips on timeline: 1. select the clips; 2. just type the number of seconds (such as +130); 3. return(?)

Editing Item Properties
1. select one or multiple clips
2. Edit » Item Properties or Project Properties

Working with render files
learn the video lesson again when I need!
Sequence » Settings » Video Processing tab & Render Control tab
For HDV, use ProRes 422.

Render Manager
  • under Tools menu
  • use it only at the end of a project
  • "Constant Frames" folder - leave it alone

Media Manager
(learn the video lesson when I need)

More