http://www.lynda.com/home/DisplayCourse.aspx?lpk2=430
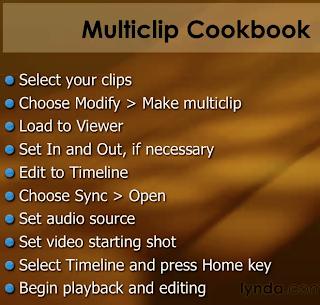
10. Multiclip Editing - watch the movies for details
Dynamic RT and Unlimited RT
Safe RT (by default) means that the video quality is the highest during play-back. However, when working with multiclip, it should be set at Unlimited RT.Unlimited RT decreases the video play-back quality during editing (only); the final video quality is still high.
11. Using transitions
Apply a transition
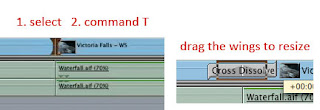
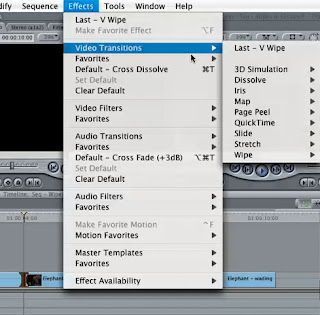
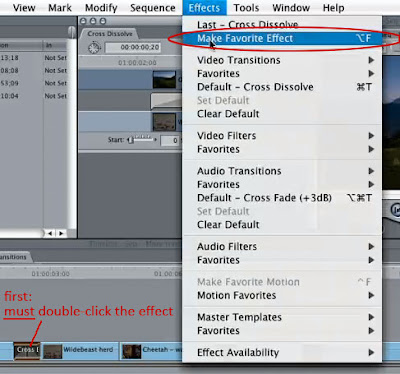
 Using the Effect menu
Creating favorite transition
 creating favorite
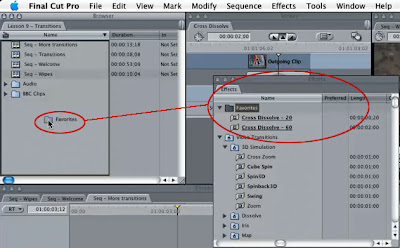
copy Favorites from the Effects folder to the Project folder. This will keep Favorites from being trashed with the application preference file.
Change the default transition
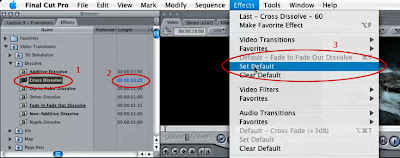
 or press Command + D
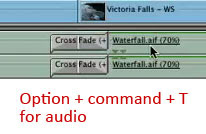
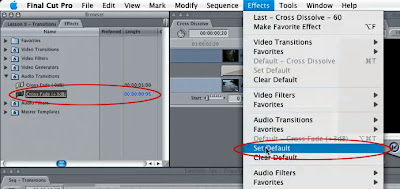 For Audio transitions, according to the instructor, "Cross Fade (+3dB)" should be the default. And 5 frame transition is the his best choice.
Apply multiple transitions at once
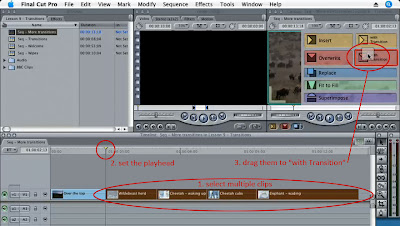
 result on the timeline
Intro to rendering
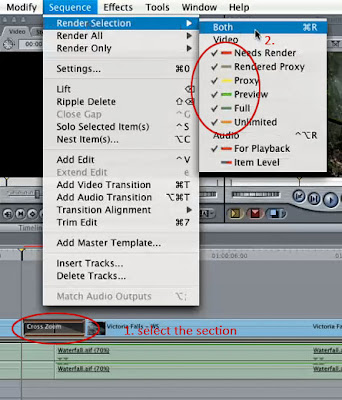
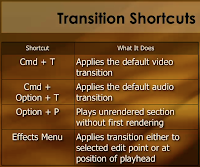
Shortcuts
12. Editing audio
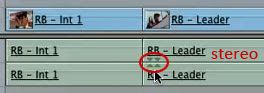
two types: Dual-channel-mono (FCP default) & stereo
Speaking should normally be set at dual-mono
Waveforms
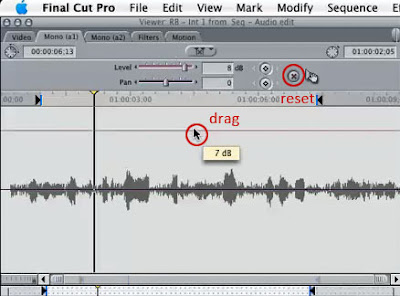 The red line controls volume level; the dark line controls left/right speaker output (called Pan).
 or click on the red envelop button (outside of this image)
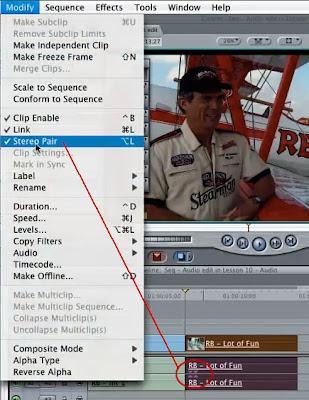
Split or combine audio pairs
Track overlay
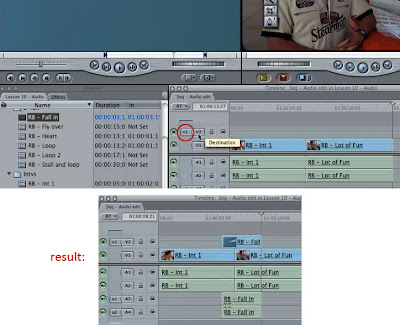
Split inserting video/audio
Trimming audio
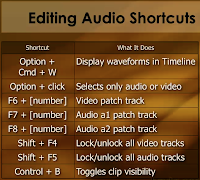
 Option + Command + W displays the waive form on the timeline.
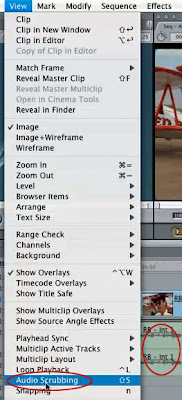
Audio Scrubbing is for hearing audio while scrubbing the timeline.
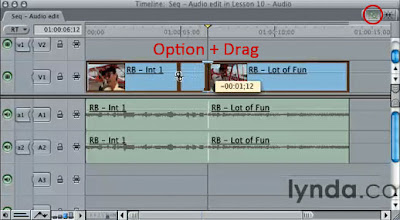
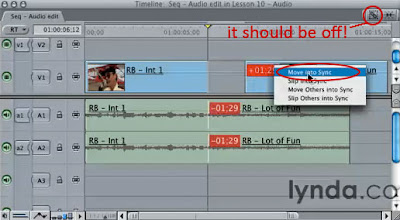 right-click on the red tag and choose "Move into Sync" can fix the broken connection.
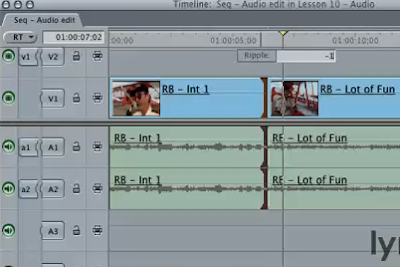 1. use the roll tool or ripple tool
2. select/click the joints
3. just type numbers, such as 1 or -1 (go forward or backward 1 frame)
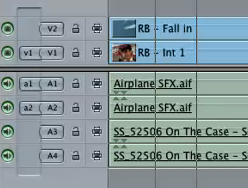
Link and unlink clips

 underline means that they are linked
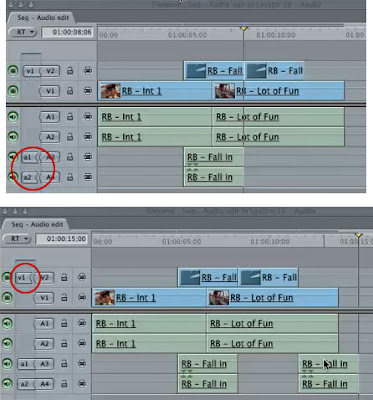
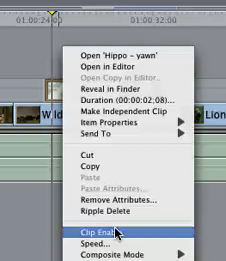
Visibility Lights
 When green visibility lights are off, FCP will delete all selected clips' renderings
and those clips don't export for the final product.
 "Clip Enable" (command + B) toggles the clip's visibility.
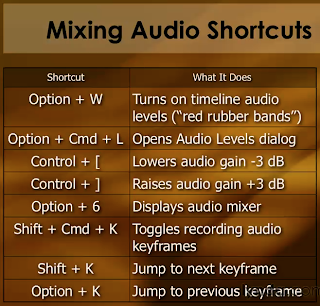
Shortcuts
13. Mixing audio
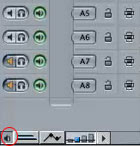
Using the Audio Meter and Clip lights
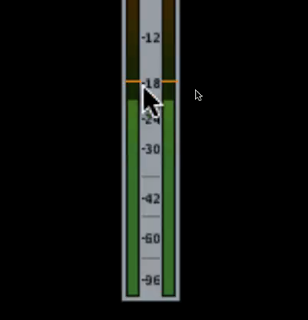 The yellow bar in the Audio Meter means the Pick Hold Indicator showing how loud the sound is in the last two seconds.
The loudest scale on the meter is zero. If the sound goes over zero, the red lights will be turned on.
The red lights on the top should never be on. Otherwise, the final audio output is destroyed.
Setting Clip Audio Levels
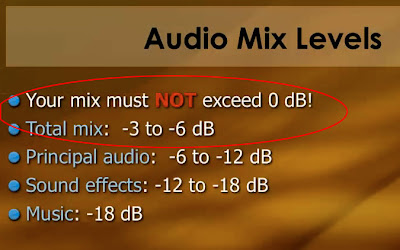 The first two must to be obeyed. the rest three are for suggestions.
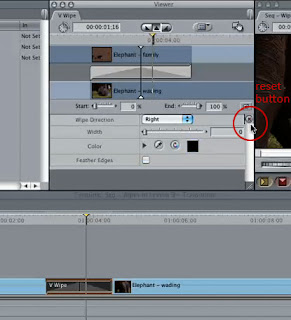
To adjust level/Gain and pan, use the preview window by double clicking on the audio track(s). The reset button is a circle with an "x" on the right side.
 value: -6 to -4.5
Mixing Audio in Final Cut Pro
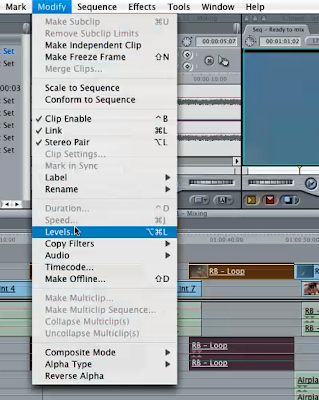
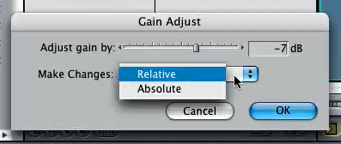 Modify»Level can control multiple audio tracks.
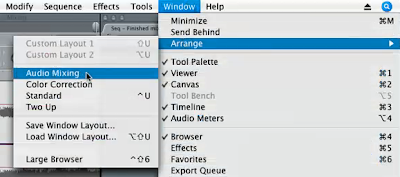
 Demo working environment
Using the Audio Mixer
 always leave the master fader alone!
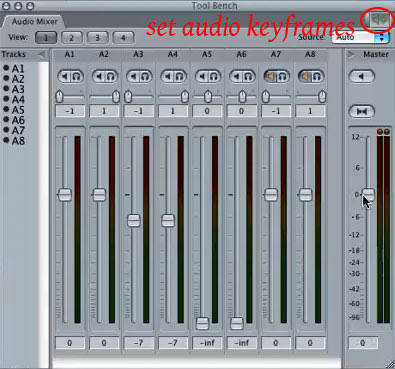 while arrow tool is selected, hold down the Option key, the pen tool will appear when the mouse is close to the pink audio gain line.
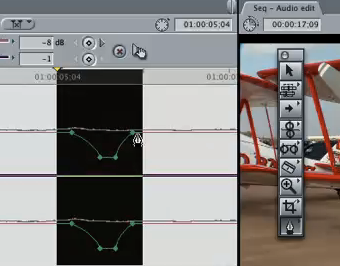
Keyframes can be edited by clicking and dragging
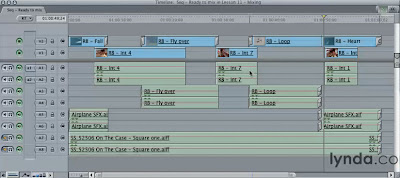
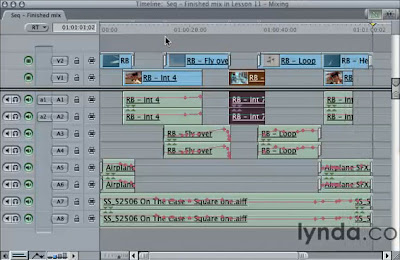 Demo work result
Finishing your mix
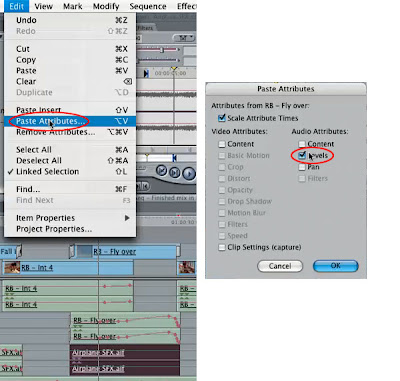 To copy only keyframes from one clip to the next (not the content):
this is also great for editing two mono sound tracks.
1. select and copy the clip
2. select the next clip
3. Edit»Paste Attributes
4. choose "Level," then "OK"
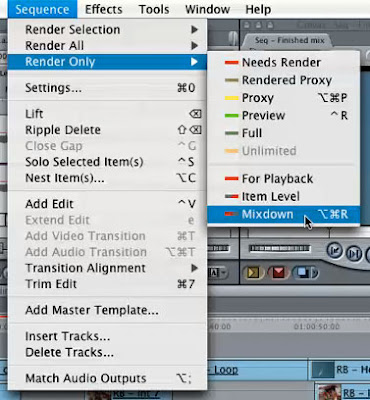 This only renders the audio "Mixdown."
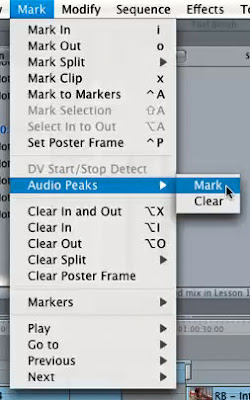 its shows all audio peaks above zero by using labels. Great!
to remove labels, choose "clear"
Shortcuts
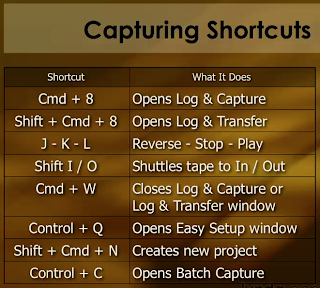
14. Capturing
1. always save and name the new project
2. ProRes 422 is good for HDV sequences - render-time drops down a lot.
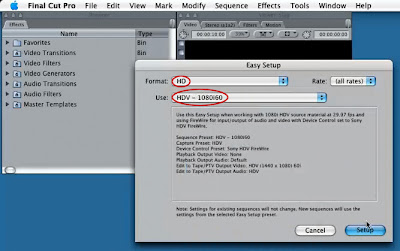 settings for capturing HDV
Summary & Shortcuts

16. Importing
Importing files and folders
File » Import » files/folder
Converting compressed audio
FCP supports only uncompressed files: AIFF, WAVE, SD2
Use iTunes to convert MP3/MP4/AAC files to uncompressed files
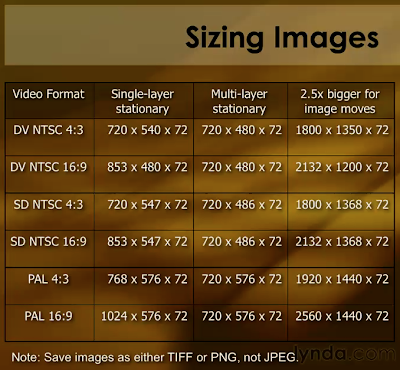
Sizing graphics for video
Computer using square pixels; video using rectangular pixels
Shortcuts
Cmd + I = Importing files
17. Exporting
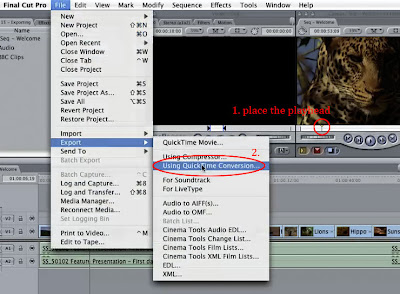
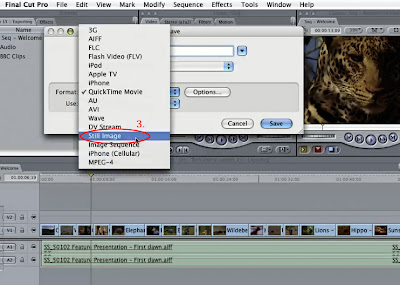
Exporting a still frame
a still frame can be exported either from the timeline or the viewer. see the 3 steps.
In Photoshop, 1) if the image has thin horizontal lines, do De-Interlace first (use default settings)
In Photoshop, 2) then, change img size from 720x480 to 640x480

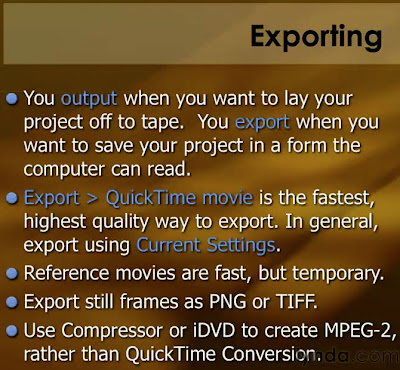
Exporting a QuickTime movie
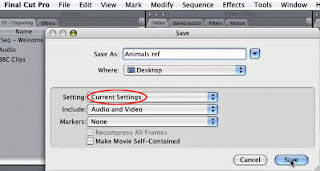
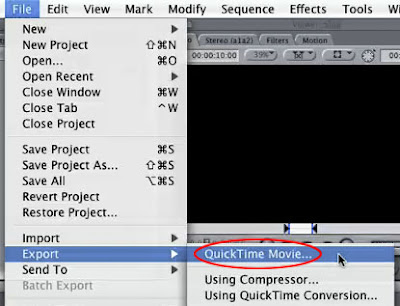 for highest quality and fastest speed, choose "QuickTime Movie"
For DVD or web, make a reference movie.
This file type is designed to be a temporary file to move from FCP to compression.
(thoughts: since I cannot find the linked rendered video file, I could however try creating a video(no audio) file first and then create a reference movie. The reference movie contains only audio info. This idea has not been tested yet.)


Exporting for Compressor
may get slightly higher quality than "QuickTime Movie," if the video contains a lot of motion.
Exporting for QuickTime conversion
This automatically down samples the videos to 8bit. So it does not provide the highest quality, nor the smallest file size, than "QuickTime Movie." It should only be a temporary solution, not for final output.
(listen to the video lesson again to refresh memory)
Exporting as AIFF and OMF
Exporting audio for Soundtrack Pro
Exporting with multichannel output
(learn the video lessons when I need)
Exporting Summary
18. Managing Media
Making files go offline
right-click on the clip or go to the Modify menu
Reconnecting files
right-click on the clip or go to the File menu
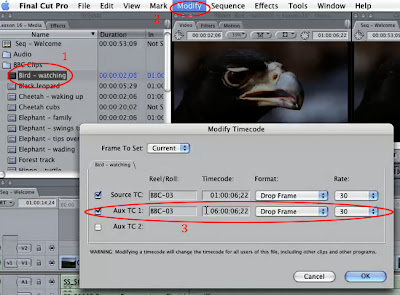
Changing timecode
1. clip timecode change
2. sequence timecode change

 to move the clips on timeline: 1. select the clips; 2. just type the number of seconds (such as +130); 3. return(?)
Editing Item Properties
1. select one or multiple clips
2. Edit » Item Properties or Project Properties
Working with render files
learn the video lesson again when I need!
Sequence » Settings » Video Processing tab & Render Control tab
For HDV, use ProRes 422.
Render Manager
Media Manager
(learn the video lesson when I need)
More
10. Multiclip Editing - watch the movies for details

Dynamic RT and Unlimited RT
Safe RT (by default) means that the video quality is the highest during play-back. However, when working with multiclip, it should be set at Unlimited RT.Unlimited RT decreases the video play-back quality during editing (only); the final video quality is still high.

11. Using transitions
Apply a transition

 Using the Effect menu


Effects Tab = Effects Menu
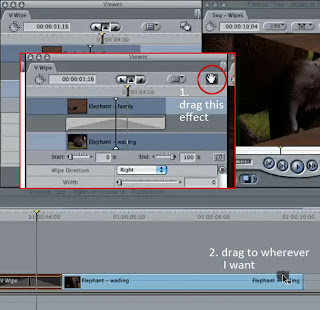
Option drag the effect to duplicate on the timeline
Option drag the effect to duplicate on the timeline
Creating favorite transition

 creating favorite
copy Favorites from the Effects folder to the Project folder. This will keep Favorites from being trashed with the application preference file.
Change the default transition

 or press Command + D
 For Audio transitions, according to the instructor, "Cross Fade (+3dB)" should be the default. And 5 frame transition is the his best choice.
Apply multiple transitions at once

 result on the timeline
Intro to rendering

Option + P = preview in the timeline without rendering
Shortcuts

12. Editing audio

two types: Dual-channel-mono (FCP default) & stereo
Speaking should normally be set at dual-mono
Waveforms
 The red line controls volume level; the dark line controls left/right speaker output (called Pan).
 or click on the red envelop button (outside of this image)
 Split or combine audio pairs

Track overlay

FCP allows 99 tracks of video and 99 tracks of audio.
Split inserting video/audio

Trimming audio
 Option + Command + W displays the waive form on the timeline.
Audio Scrubbing is for hearing audio while scrubbing the timeline.
Command + Option + T = adding transition
 right-click on the red tag and choose "Move into Sync" can fix the broken connection.
 1. use the roll tool or ripple tool
2. select/click the joints
3. just type numbers, such as 1 or -1 (go forward or backward 1 frame)
Link and unlink clips

 underline means that they are linked
 FCP allows up to 24 audio tracks linked to 1 video clip
Visibility Lights
 When green visibility lights are off, FCP will delete all selected clips' renderings
and those clips don't export for the final product.
 "Clip Enable" (command + B) toggles the clip's visibility.
 Shortcuts

13. Mixing audio
Using the Audio Meter and Clip lights
 The yellow bar in the Audio Meter means the Pick Hold Indicator showing how loud the sound is in the last two seconds.
The loudest scale on the meter is zero. If the sound goes over zero, the red lights will be turned on.
The red lights on the top should never be on. Otherwise, the final audio output is destroyed.
Setting Clip Audio Levels
 The first two must to be obeyed. the rest three are for suggestions.
To adjust level/Gain and pan, use the preview window by double clicking on the audio track(s). The reset button is a circle with an "x" on the right side.

 value: -6 to -4.5
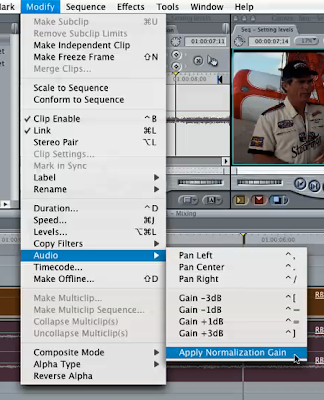
Apply Normalization Gain function normalizes the entire audio gain.
This is good for uneven speech, etc.
This is good for uneven speech, etc.
Mixing Audio in Final Cut Pro


 Modify»Level can control multiple audio tracks.
 Demo working environment
Using the Audio Mixer

 always leave the master fader alone!
to reset: Option + click on the slider
 while arrow tool is selected, hold down the Option key, the pen tool will appear when the mouse is close to the pink audio gain line.
Keyframes can be edited by clicking and dragging
If I want to start at a low audio volume and go higher, set the audio level low at first by drag the slider to a low level while the Record Keyframe button is not selected, then select the Record Keyframe button and drag the slider to higher levels.
 Demo work result
Finishing your mix
 To copy only keyframes from one clip to the next (not the content):
this is also great for editing two mono sound tracks.
1. select and copy the clip
2. select the next clip
3. Edit»Paste Attributes
4. choose "Level," then "OK"
 This only renders the audio "Mixdown."
 its shows all audio peaks above zero by using labels. Great!
to remove labels, choose "clear"
Shortcuts

14. Capturing
need to refresh this chapter
1. always save and name the new project
2. ProRes 422 is good for HDV sequences - render-time drops down a lot.
 settings for capturing HDV
Summary & Shortcuts


16. Importing
Importing files and folders
File » Import » files/folder
Converting compressed audio
FCP supports only uncompressed files: AIFF, WAVE, SD2
Use iTunes to convert MP3/MP4/AAC files to uncompressed files
Sizing graphics for video
Computer using square pixels; video using rectangular pixels
Don't use JPEG! - use TIFF or PNG

Shortcuts
Cmd + I = Importing files
17. Exporting
Exporting a still frame
a still frame can be exported either from the timeline or the viewer. see the 3 steps.


In Photoshop, 1) if the image has thin horizontal lines, do De-Interlace first (use default settings)
In Photoshop, 2) then, change img size from 720x480 to 640x480

Exporting a QuickTime movie
 for highest quality and fastest speed, choose "QuickTime Movie"
For DVD or web, make a reference movie.
This file type is designed to be a temporary file to move from FCP to compression.
(thoughts: since I cannot find the linked rendered video file, I could however try creating a video(no audio) file first and then create a reference movie. The reference movie contains only audio info. This idea has not been tested yet.)


"Setting: Current Setting" has always the highest quality.

Exporting for Compressor
may get slightly higher quality than "QuickTime Movie," if the video contains a lot of motion.
Exporting for QuickTime conversion
This automatically down samples the videos to 8bit. So it does not provide the highest quality, nor the smallest file size, than "QuickTime Movie." It should only be a temporary solution, not for final output.
(listen to the video lesson again to refresh memory)
Exporting as AIFF and OMF
Exporting audio for Soundtrack Pro
Exporting with multichannel output
(learn the video lessons when I need)
Exporting Summary

18. Managing Media
Making files go offline
right-click on the clip or go to the Modify menu
Reconnecting files
right-click on the clip or go to the File menu
Changing timecode
1. clip timecode change

2. sequence timecode change

 to move the clips on timeline: 1. select the clips; 2. just type the number of seconds (such as +130); 3. return(?)
Editing Item Properties
1. select one or multiple clips
2. Edit » Item Properties or Project Properties
Working with render files
learn the video lesson again when I need!
Sequence » Settings » Video Processing tab & Render Control tab
For HDV, use ProRes 422.

Render Manager
- under Tools menu
- use it only at the end of a project
- "Constant Frames" folder - leave it alone
Media Manager
(learn the video lesson when I need)
More