http://www.lynda.com/home/DisplayCourse.aspx?lpk2=430


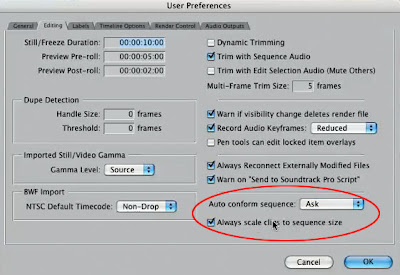
Easy setup and Audio/Video Settings


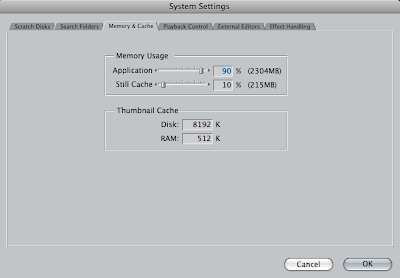
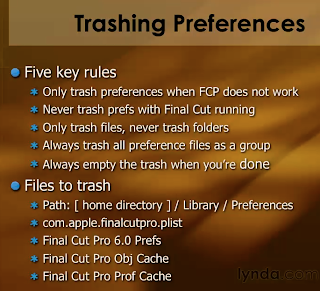
Normally don't mess up the settings.
 This was the tutorial setting.
4. Learn The Interface
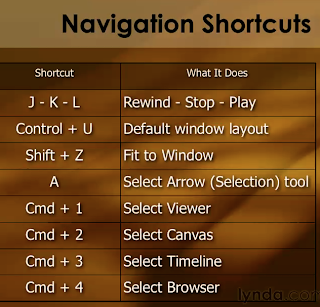
Press "Home" and "End" keys
Press arrow keys
Press J key once to play backward; twice to backward double speed; three times to backward 3 speed; and so on
Press K key to stop;
Press L key once to go forward; twice to forward double speed; three times to forward 3 speed; and so on
Press J and K to backward at 1/3 speed
Press L and K to forward at 1/3 speed
Shift + Z to fit the timeline/sequence in the window
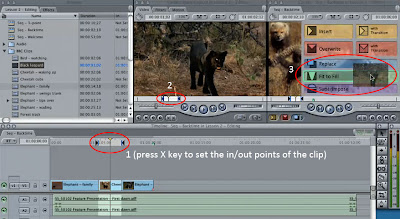
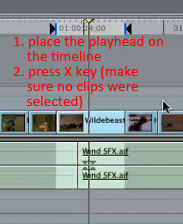
Press X key to set the in/out points of a clip where the playhead is on the timeline
In the time code area, type -300 to move 300 frames backwards, type 200 to move 200 frames forwards.
Control + U to reset the working windows to the default
Control + Opton + W key to toggle the sound waves.

5. Building Your Story
Shift + Command + "[" or "]" to shift between tabs in a window
**Set the audio 5 to 10 frames late, because it tends to be cropped in the QuickTime file.
Making in/out of a clip
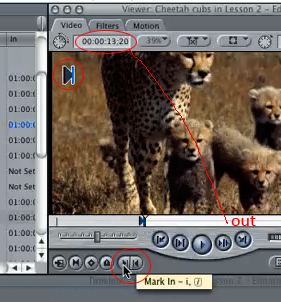 Press the "I" key and "O" key to set the in/out pints.
Option "I" or "O" key to remove the in/out points.
Option "X" key to remove both in and out points.
Press "X" key to set both in and out points on a timeline.
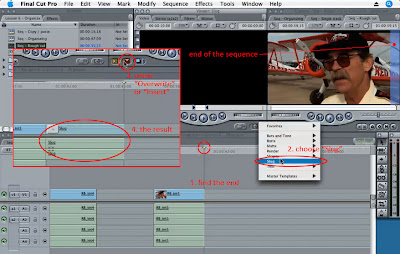
Insert/Overwrite Clips

or by dragging for inaccurate insert
Three-point editing
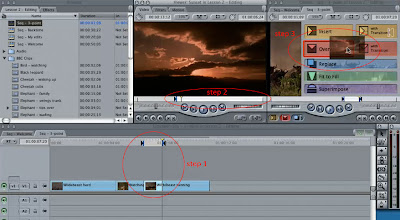
Backtime editing
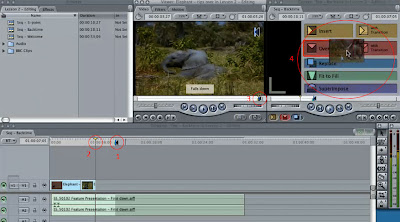
Replace Editing (based on an arbitrary target shot, instead of in/out points)
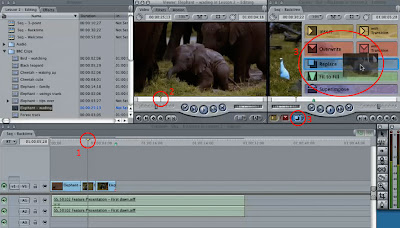
Fit to Fill Editing (it normally distorts the clip - either too slow or too fast - comic effects)
Storyboard editing
 Open-format Timelines - need to watch the video again for detailes
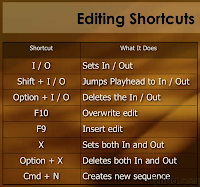
Editing shortcuts
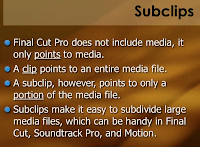
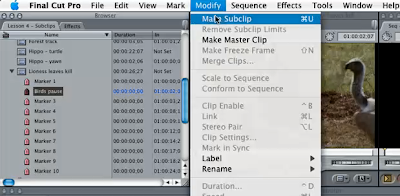
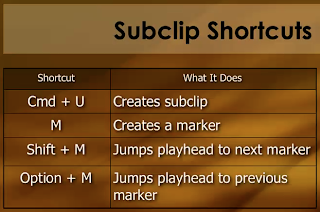
6. Using Subclips
Understanding Subclips
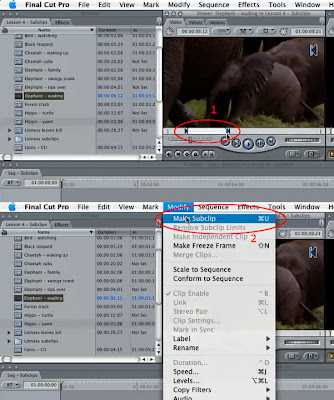
Creating Subclips - three methods
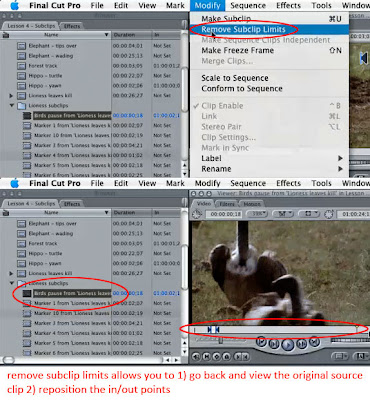
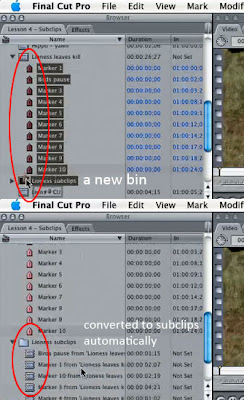 Editing with Subclips
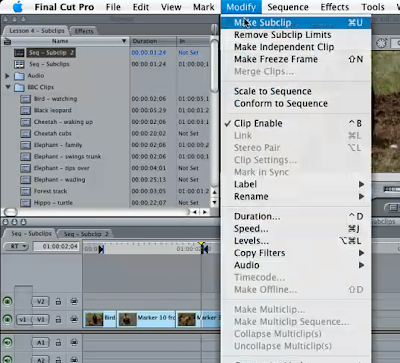 you can create a sequence from subclips by working with the timeline - see: the clips on the timeline are subclips » then set the in/out points on the timeline » then choose "make subclip" from the menu
Keyboard shortcuts
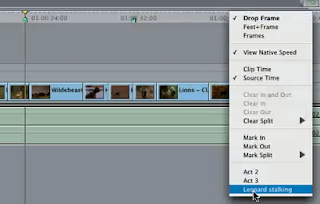
7. Using Markers
Creating and editing with markers
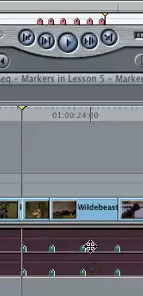 * Clip based markers travel with the clip and show on the timeline
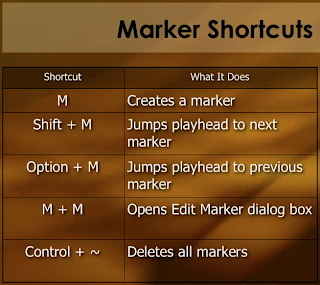
* Press M to set the marker while the clip is selected in the timeline (MUST)
* Shift M and Option M are used to travel back and forth among the markers; however, in the timeline the clip MUST be selected, otherwise the two shortcuts will not work.
* Clip based markers are also great for capturing music pitches
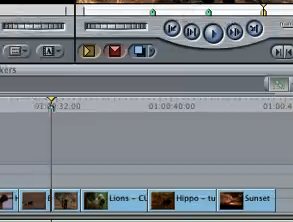 * Timeline based markers don't travel with the clips
* when setting a timeline marker, de-select all clips, then the marker will be set where the playhead is
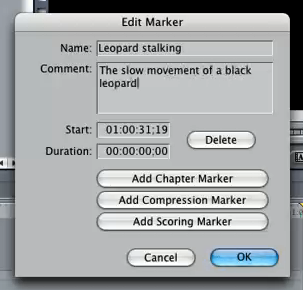
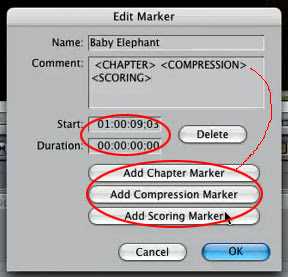
* while the playhead is on a maker, press M again to get the "Edit Marker" window
 * Shift M and Option M are used to travel back and forth among the markers
* use the timeline fly-out menu to travel back and forth among the markers
 * markers cannot be repositioned to the left - only to the right!
* delete a marker: 1st way is to choose "delete" from the "Edit Marker" window by pressing M when the marker is selected; 2nd way is to select the marker and choose "delete" from the menu
Keyboard shortcuts
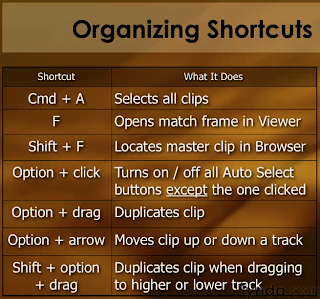
8. Organizing your story
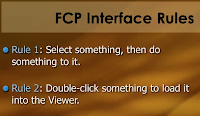
Top two Final Cut Pro interface rules
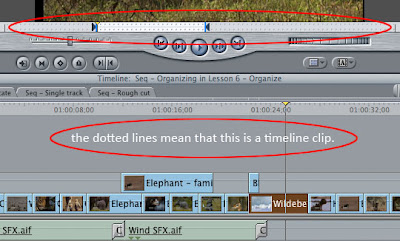
Selecting Clips
* Command A to select everything in the timeline.
 Deleting Clips
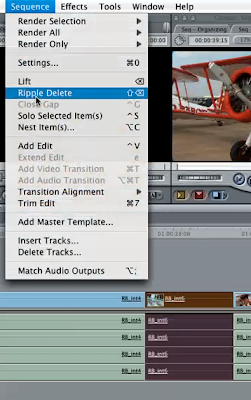
Press delete key = Lift delete
Shift + delete key = Ripple delete (it seems shift + X also works)
Insert Slug
Moving Clips
Method 1: just drag
Method 2: drag » press Option key (see below) (note: if press Option key first, it will create a copy of that clip)
 Method 3: when dragging vertically, press Shift to restrict dragging at 90 degree
Method 4: select the clip » hold Option key + press Down/Up arrow key to move vertically
Copying Clips
* Copy and Paste from the menu (may need to set the track after copying but before pasting) (see below)
* Option+drag to copy
* Option+drag » then release the mouse first » copy and insert the clip
* Option+drag » then release the Option first » copy and overwrite the clip
* Shift+Option+drag to copy and drag the new clip to a new track
 By default, the lowest # track with dark 'auto-select light' has the highest priority.
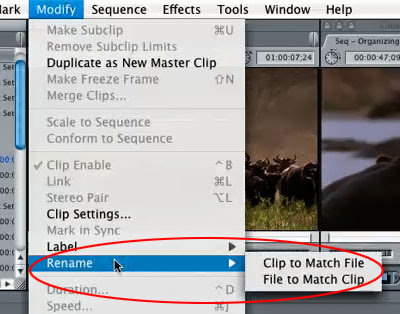
Match Clip


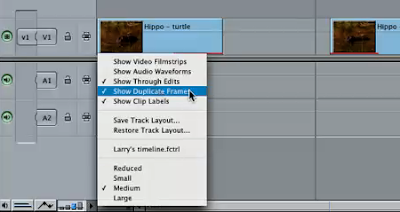
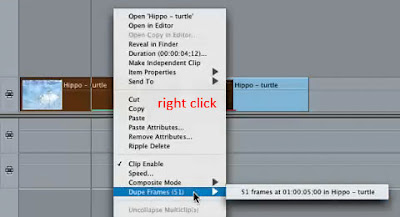
Deleting duplicate frames
Keyboard shortcuts
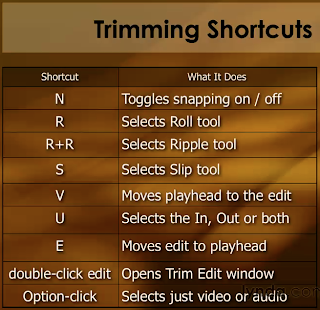
9. Trimming your story
* Press U key to toggle among the three sides of edit (the uniform)
 * Press V to have the playhead jump to the next edit point
* Arrow tool is not the best trimming tool.
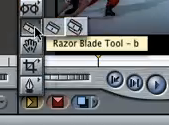
* The razor blade is for cropping big portions of clip(s), not for fine trimming.
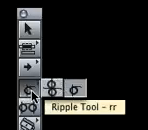
One-sided trimming: Ripple edits - best trimming tool
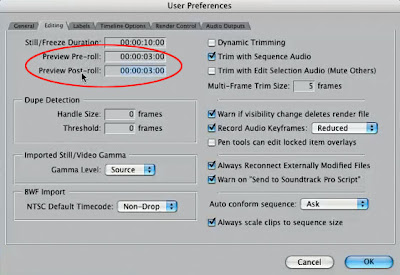
 "\" key is for previewing pre-roll and post-roll
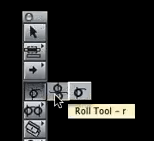
Two-sided trimming: Roll edits - best trimming tool
Ten ways to trim - watch the video again for all details
* when the playhead is playing on the timeline and an edit (the three-sided uniform) is selected, press E key to trim everything in between the playhead and the selected edit.
* trim in the viewer
* split trim
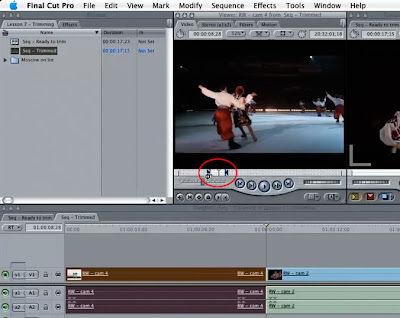
 The trim edit window - watch the video again for details
double-click edit to open the Trim Edit window
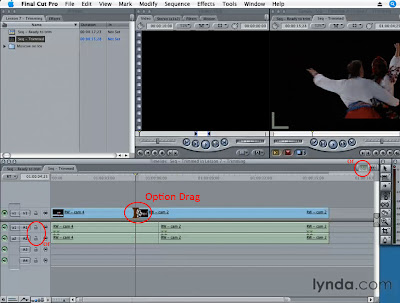
Option Drag
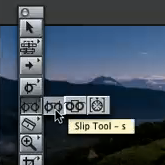
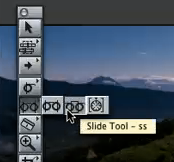
Slip and slide trimming
Keyboard shortcuts
Backtime editing
Replace Editing (based on an arbitrary target shot, instead of in/out points)
Fit to Fill Editing (it normally distorts the clip - either too slow or too fast - comic effects)
Storyboard editing
Open-format Timelines - need to watch the video again for detailes
Editing shortcuts
6. Using Subclips
Understanding Subclips

Creating Subclips - three methods
method 1

method 2

method 3
 Editing with Subclips

 you can create a sequence from subclips by working with the timeline - see: the clips on the timeline are subclips » then set the in/out points on the timeline » then choose "make subclip" from the menu
Keyboard shortcuts

7. Using Markers
Creating and editing with markers
Clip based
 * Clip based markers travel with the clip and show on the timeline
* Press M to set the marker while the clip is selected in the timeline (MUST)
* Shift M and Option M are used to travel back and forth among the markers; however, in the timeline the clip MUST be selected, otherwise the two shortcuts will not work.
* Clip based markers are also great for capturing music pitches
Timeline based marker
 * Timeline based markers don't travel with the clips
* when setting a timeline marker, de-select all clips, then the marker will be set where the playhead is
* while the playhead is on a maker, press M again to get the "Edit Marker" window
 * Shift M and Option M are used to travel back and forth among the markers
* use the timeline fly-out menu to travel back and forth among the markers

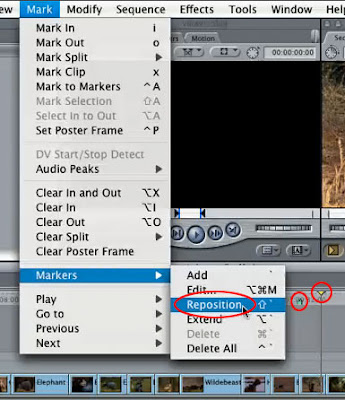
Reposition a marker
 * markers cannot be repositioned to the left - only to the right!
* delete a marker: 1st way is to choose "delete" from the "Edit Marker" window by pressing M when the marker is selected; 2nd way is to select the marker and choose "delete" from the menu
Using special markers, reset starting point, and set duration

Keyboard shortcuts

8. Organizing your story
Top two Final Cut Pro interface rules

Selecting Clips
* Command A to select everything in the timeline.

select portions of clip(s)
 Deleting Clips
Press delete key = Lift delete
Shift + delete key = Ripple delete (it seems shift + X also works)


Insert Slug

Moving Clips
Method 1: just drag
Method 2: drag » press Option key (see below) (note: if press Option key first, it will create a copy of that clip)
 Method 3: when dragging vertically, press Shift to restrict dragging at 90 degree
Method 4: select the clip » hold Option key + press Down/Up arrow key to move vertically
Copying Clips
* Copy and Paste from the menu (may need to set the track after copying but before pasting) (see below)
* Option+drag to copy
* Option+drag » then release the mouse first » copy and insert the clip
* Option+drag » then release the Option first » copy and overwrite the clip
* Shift+Option+drag to copy and drag the new clip to a new track
 By default, the lowest # track with dark 'auto-select light' has the highest priority.
 Match Clip


Deleting duplicate frames


Keyboard shortcuts

9. Trimming your story
Three sides to an edit
* Press U key to toggle among the three sides of edit (the uniform)
 * Press V to have the playhead jump to the next edit point
* Arrow tool is not the best trimming tool.
* The razor blade is for cropping big portions of clip(s), not for fine trimming.

One-sided trimming: Ripple edits - best trimming tool
 "\" key is for previewing pre-roll and post-roll

Two-sided trimming: Roll edits - best trimming tool

Ten ways to trim - watch the video again for all details
* when the playhead is playing on the timeline and an edit (the three-sided uniform) is selected, press E key to trim everything in between the playhead and the selected edit.
* trim in the viewer

* split trim
 The trim edit window - watch the video again for details
double-click edit to open the Trim Edit window
Option Drag
Slip and slide trimming


Keyboard shortcuts
